How to build a simple Win 8 Store App and also implement the Search Contract without using VS built-in Search Contract Template
I have looked into some videos and MSDN articles about the Search Contract and created a cleaner MVVM example without using the Visual Studio template for Search Contracts. The result is a fully working app also showing concepts like Search suggestions, Converters, Horizontal Listbox, XAML Resources, Blendability and INotifyPropertyChanged injection without becoming complex. Source code is included.
Overview
The Demo App lists Terry Pratchetts wonderful books about the Discworld.
The Discworld is a flat planet carried on the backs of four giant elephants – Berilia, Tubul, Great T’Phon and Jerakeen – which in turn stand upon the pock-marked shell of the star turtle Great A’Tuin. It exists right on the edge of Reality, and as such ‘the least little thing can break through from the other side’.
It contains three pages:
- StartPage: Welcoming page.
- BookPage: Lists book series and book details.
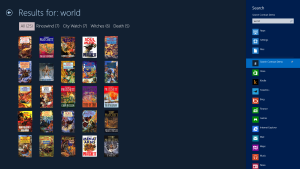
- SearchResultPage: Shows a list of book matching a search query.
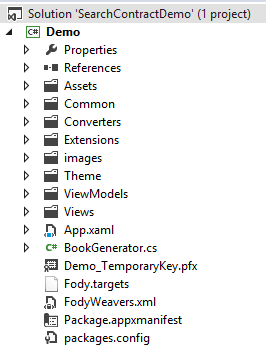
It is built as a one project Visual Studio 2012 solution with the following structure:
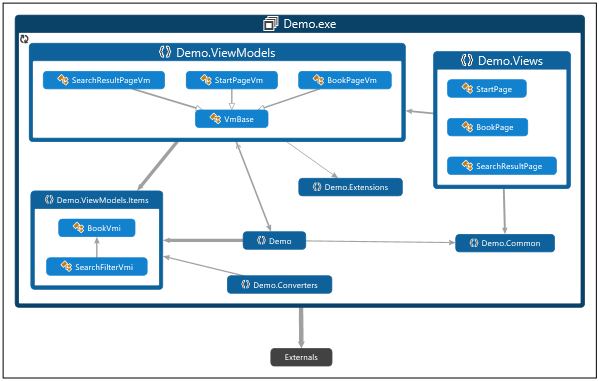
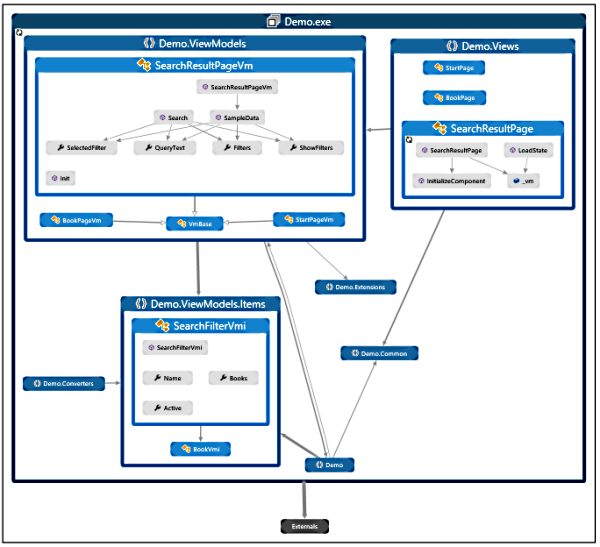
and have this code dependency graph:
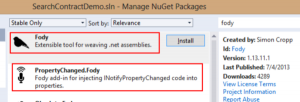
It is using the Fody and PropertyChanged.Fody NuGet packages for automagically injecting INotifyPropertyChanged code into properties. If you are new to NuGet, watch this YouTube video: How do you install a NuGet package in Visual Studio 2012?
StartPage – MVVM
The StartPage let the user tap on “Show all books” or one of the three featured books. Both choices will lead to the BookPage. But let us stay on the StartPage while looking into how I used the MVVM pattern in this app.
The StartPage XAML defines it’s datacontext as the StartPageVm (ViewModel).
<common:LayoutAwarePage.DataContext>
    <viewModels2:StartPageVm />
</common:LayoutAwarePage.DataContext>
The StartPageVm expose a property named FeaturedBooks
public ObservableCollection FeaturedBooks { get; set; }
and fills it with BookVmi (ViewModelItems) in its Init() method:
public async Task Init()
{
// Get three random books to show as "featured books"
var generator = new BookGenerator();
var books = generator.CreateDiscWorldCollection();
books.Shuffle();
var randomList = (books.Select(b => b)).Take(3);
FeaturedBooks = new ObservableCollection(randomList);
}
The StartPage XAML finally databinds the ListBox showing featured Books to the StartPageVm property:
<ListBox x:Name="FeaturedBooksListBox" ItemsSource="{Binding FeaturedBooks}"/>
Fody
The ViewModels have a base class, VmBase, which implements the INotifyPropertyChanged interface. This will trigger the extension Fody and its plugin PropertyChanged.Fody to inject PropertyChanged code into the ViewModels properties. This leads to a much more readable source code and saves the developer from writing repetitive code.
StartPage – Blendability
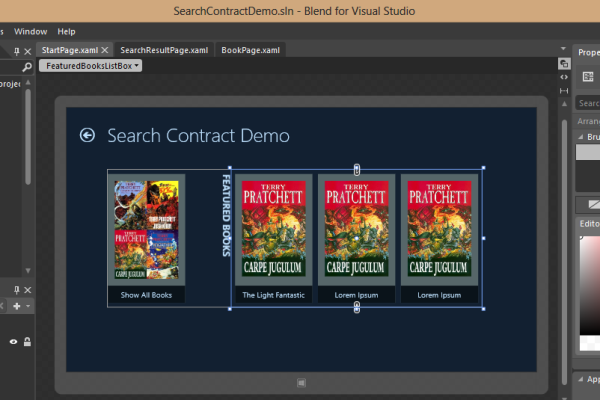
Blendability is about how to enable designers to see the correct preview of their Views in Visual Studio and/or Expression Blend. The image above shows how the StartPage looks like in Blend. You (or your designer if you are lucky and have one) will appreciate to have sample data when creating the UI.
One way to achieve this is by generating sample data from inside Blend. It works mostly but I have had some problems with maintaining the sample data and prefer to create the sample data in the ViewModel.
public ObservableCollection<BookVmi> FeaturedBooks { get; set; }

public StartPageVm()
{
    if (DesignMode)
    {
        SampleData();
    }
}

private void SampleData()
{
    var books = new List<BookVmi>
        {
            new BookVmi {Cover = "/images/185px-Carpe-jugulum-1.jpg", Title = "The Light Fantastic"},
            new BookVmi {Cover = "/images/185px-Carpe-jugulum-1.jpg", Title = "Lorem Ipsum"},
            new BookVmi {Cover = "/images/185px-Carpe-jugulum-1.jpg", Title = "Lorem Ipsum"}
        };
    FeaturedBooks = new ObservableCollection<BookVmi>(books);
}
BookPage – Horizontal ListBox
The BookPage let the user select a book from the horizontal ListBox and shows details about it above. This is how to make a ListBox show its items horizontal:
<ListBox Grid.Row="2" x:Name="BooksListBox" ItemsSource="{Binding Books}"
            ItemTemplate="{StaticResource BooksTemplate}" Style="{StaticResource CleanListBoxStyle}"
            VerticalAlignment="Top" HorizontalAlignment="Left" Margin="120,80,20,0"
            SelectedItem="{Binding SelectedBook, Mode=TwoWay}" Height="166"
            ItemContainerStyle="{StaticResource CleanListBoxItemStyle}">
    <ListBox.ItemsPanel>
        <ItemsPanelTemplate>
            <VirtualizingStackPanel Orientation="Horizontal" />
        </ItemsPanelTemplate>
    </ListBox.ItemsPanel>
</ListBox>
SearchResultPage – Converters
We are now closing in on the real topic for this post. The SearchResultPage will show books with titles or descriptions containing the search query. It will also group the books by book series at the top of the page. This grouping is called filtering in the MSDN example.
Value Converters can be used to convert databinded data to something better suited for the UI. Most things can probably be done in the ViewModel and Converters might have a performance penalty. But they are quite nifty encapsulated functions.
As an example the SearchResultPage use a converter named ListEmptyToVisibilityConverter. It helps to decide if the “No results match your search”-text or the search result grids will be visible.
<TextBlock
    Grid.Row="1"Margin="120,50,0,0"
    Visibility="{Binding Filters, ConverterParameter=true, Converter={StaticResource ListEmptyToVisibilityConverter}}"
    Style="{StaticResource SubheaderTextStyle}"
    Text="No results match your search." />
You create a converter by implementing the IValueConverter interface:
public sealed class ListEmptyToVisibilityConverter : IValueConverter
{
    /// <summary>
    /// If set to True, conversion is reversed: True will become Collapsed.
    /// </summary>
    public bool IsReversed { get; set; }

    public object Convert(object value, Type targetType, object parameter, string language)
    {
        IsReversed = System.Convert.ToBoolean(parameter as string);

        if (value is IList)
        {
            var result = value as IList;
            var test = result.Count != 0;
            if (IsReversed)
            {
                test = !test;
            }
            return test ? Visibility.Visible : Visibility.Collapsed;
        }

        return Visibility.Collapsed;
    }

    public object ConvertBack(object value, Type targetType, object parameter, string language)
    {
        throw new NotImplementedException();
    }
}
Theme Folder – XAML Resources
The final topic before starting with the Search Contract is XAML Resources. I have extracted all edited XAML templates to AppStyles.xaml, all brushes to Brushes.xaml, colors to Colors.xaml and text styles to TextStyles.xaml. I recommend to have it this way instead of hard coding all colors into the pages.
<ResourceDictionary
    xmlns="http://schemas.microsoft.com/winfx/2006/xaml/presentation"
    xmlns:x="http://schemas.microsoft.com/winfx/2006/xaml">

    <ResourceDictionary.MergedDictionaries>
        <ResourceDictionary Source="ms-appx:///Theme/Colors.xaml"/>
    </ResourceDictionary.MergedDictionaries>

    <SolidColorBrush x:Key="AppBlueBrush" Color="{StaticResource AppBlueColor}"/>
    <SolidColorBrush x:Key="AppBlueBrush2" Color="{StaticResource AppBlueColor2}"/>
    <SolidColorBrush x:Key="AppBlueBrush3" Color="{StaticResource AppBlueColor3}"/>
    <SolidColorBrush x:Key="AppBlueBrush4" Color="{StaticResource AppBlueColor4}"/>
    <SolidColorBrush x:Key="AppBlueBrush5" Color="{StaticResource AppBlueColor5}"/>

    <SolidColorBrush x:Key="AppBlackBrush" Color="{StaticResource AppBlackColor}"/>
    <SolidColorBrush x:Key="AppWhiteBrush" Color="{StaticResource AppWhiteColor}"/>

    <SolidColorBrush x:Key="AppDimBlackBrush" Color="{StaticResource AppDimBlackColor}"/>
    <SolidColorBrush x:Key="AppDimWhiteBrush" Color="{StaticResource AppDimWhiteColor}"/>
    <SolidColorBrush x:Key="AppDimWhite2Brush" Color="{StaticResource AppDimWhite2Color}"/>
    <SolidColorBrush x:Key="AppDimWhite3Brush" Color="{StaticResource AppDimWhite3Color}"/>

</ResourceDictionary>
Dictionaries are merged by adding a ResourceDictionary to the generic collection referenced by MergedDictionaries. This can be done in App.xaml:
<Application
    x:Class="Demo.App"
    xmlns="http://schemas.microsoft.com/winfx/2006/xaml/presentation"
    xmlns:x="http://schemas.microsoft.com/winfx/2006/xaml">
    <Application.Resources>
        <ResourceDictionary>
            <ResourceDictionary.MergedDictionaries>
                <ResourceDictionary Source="Common/StandardStyles.xaml"/>
                <ResourceDictionary Source="Theme/AppStyles.xaml"/>
                <ResourceDictionary Source="Theme/Colors.xaml"/>
                <ResourceDictionary Source="Theme/Brushes.xaml"/>
                <ResourceDictionary Source="Theme/Textstyles.xaml"/>
            </ResourceDictionary.MergedDictionaries>
        </ResourceDictionary>
    </Application.Resources>
</Application>
And this is how you will reach the brushes in Blend:
Search Contract
When you add the Search Contract, users can search your app from anywhere in their system by selecting the Search charm. The rest of the post will now show how to implement this and also how to add search suggestions under the search box in the search pane.
You can read more about the Search Contract here: Quickstart – Adding search to an app (Windows Store apps using C#/VB/C++ and XAML) , Windows Store apps for Absolute Beginners with C#, Part 20: Implementing the Search Contract and 31 days of Windows 8 day 6 Search Contract.
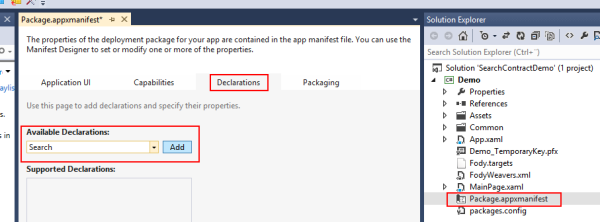
Declare the Search contract in the app manifest
Declare the Search contract in the app manifest by adding its declaration.
Respond to a search queries
Override the OnSearchActivated method in App.xaml.cs and fetch the query string from the SearchActivatedEventArgs. Pass this to the SearchResultPage.
protected override async void OnSearchActivated(SearchActivatedEventArgs args)
{   //...
    //more code in downloadable source
    frame.Navigate(typeof (SearchResultPage), args.QueryText);
    Window.Current.Content = frame;

    // Ensure the current window is active
    Window.Current.Activate();
}
Implement View, ViewModel and ViewModelItems for SearchResults
The SearchResultPage will receive the query string in the LoadState method. It will forward it to the ViewModels Search method:
protected override async void LoadState(Object navigationParameter, Dictionary<String, Object> pageState)
{
    await _vm.Init();
    var query = navigationParameter as String;
    _vm.Search(query);
}
The SearchResultPageVm will find all books matching the search query and group them in series (Filter). The app will only show series with at least one book in it. The Search method will finally set the properties the view is databinded to.
public ObservableCollection<SearchFilterVmi> Filters { get; set; }
public SearchFilterVmi SelectedFilter { get; set; }
public string QueryText { get; set; }

public void Search(string query)
        {
            var queryText = query.ToLower();

            var generator = new BookGenerator();
            var books = generator.CreateDiscWorldCollection();
            var filters = new List<SearchFilterVmi>();

            var result = books.FindAll(x => x.Title.ToLower().Contains(queryText) || x.Description.ToLower().Contains(queryText));

            if (result.Count > 0)
            {
                var all = new List<BookVmi>(result);
                var groupedBooks = result.GroupBy(x => x.Serie);

                filters.AddRange(from @group in groupedBooks
                                 let items = new List<BookVmi>(@group.ToList())
                                 select new SearchFilterVmi {Active = false, Books = items, Name = @group.Key});

                filters.Sort((x, y) => y.Books.Count.CompareTo(x.Books.Count));
                filters.Insert(0, new SearchFilterVmi {Active = true, Books = all, Name = "All"});

                Filters = new ObservableCollection<SearchFilterVmi>(filters);
                SelectedFilter = Filters[0];
            }
            else
            {
                Filters = new ObservableCollection<SearchFilterVmi>();
            }

            QueryText = queryText;
        }
Each Filter will have a name, a list of books and an active flag.
public class SearchFilterVmi
    {
        public string Name { get; set; }
        public List<BookVmi> Books { get; set; }
        public bool Active { get; set; }
    }
The view SearchResultPage will finally bind its UI to the ViewModel to make the search feature work.
Add search suggestions
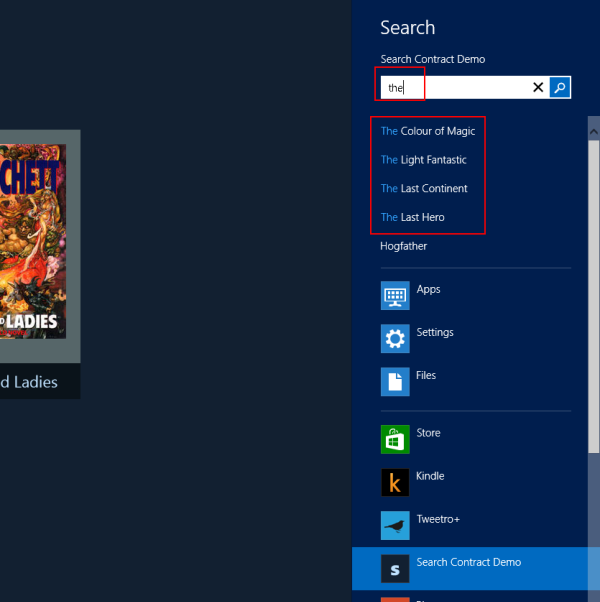
Search suggestions are displayed under the search box in the search pane. This demo app will give suggestions on all the book titles matching what the user actively is typing in the search box.
Register for the SuggestionsRequested event in the App.xaml.cs OnLaunched method. This is also a good place to fetch all keywords to use later when the event is handled.
private List<string> _searchKeywords;

protected override void OnLaunched(LaunchActivatedEventArgs args)
        {
            // Complete code in the downloadable example
            if (rootFrame == null)
            {
                if (_searchKeywords == null)
                {
                    var generator = new BookGenerator();
                    _searchKeywords = generator.GetBookKeyWords();
                }

                SearchPane.GetForCurrentView().SuggestionsRequested += App_SuggestionsRequested;

                        }
The App_SuggestionsRequested method will handle the event by obtaining suggestions and populating the SearchSuggestionCollection based on the user’s SearchPaneSuggestionsRequestedEventArgs.QueryText.
private void App_SuggestionsRequested(SearchPane sender, SearchPaneSuggestionsRequestedEventArgs args)
        {
            var query = args.QueryText.ToLower();

            foreach (var word in _searchKeywords.Where(word => word.ToLower().Contains(query)))
            {
                args.Request.SearchSuggestionCollection.AppendQuerySuggestion(word);
            }
        }
Great 🙂 The app user will now both be able to use the search pane and also have search suggestions!
Summary
I have described how to create a simple MVVM Windows Store App and implement the Search Contract without using the Visual Studio template to keep the code as clean as possible. Please note that this is not a complete or performance optimized app even if it has some more code parts implemented than a normal feature demo
The book info is from the http://discworld.wikia.com licensed under the Creative Commons Attribution-Share Alike License.
You can download the entire sample solution here:


